Tools in a Zoom Meeting
1. Test speaker and microphone audio test.
- Always complete the audio test at the beginning of a Zoom meeting. If it doesn’t open automatically at the beginning of the meeting, you can find it by clicking the tiny arrow next to the microphone icon.
- Click Test speaker and microphone and follow the instructions on the screen.
2. Microphone and camera.
- When the microphone and camera are muted, a red bar appears over the icon. This means other meeting participants cannot hear you or see your video feed.
- Clicking the microphone or video camera icon removes the red bar, allowing others to hear and/or see you.
- It is courteous to turn on the video camera when it is your turn to speak so that other participants can see the speaker. It is recommended to use the video camera, especially if the meeting involves group work.
- In Zoom, you can use virtual backgrounds or background blur when sharing your video feed. Click the arrow next to the video camera icon, select Video & effects settings or Blur My Background.
3. View: Gallery/Speaker.
- Click the nine dots in the top right-hand corner of a Zoom meeting.
- Choose Gallery if you want to see all meeting participants at once.
- Choose Speaker if you want to see a large image of the participant currently speaking.
- Your selection only affects your own Zoom view. You can also try out other view options.
4. Chat.
- Teachers can engage with the meeting participants and request comments or ideas through the chat.
- In the chat, you can write messages visible to everyone or choose a specific person from the participant list to send a private chat message.
- For example, a student can send a private message to the teacher in the chat if they do not want other meeting participants to see the question or comment.
- Sometimes, for pedagogical reasons, the teacher may ask to send all messages only as private messages to them.
5. Share screen.
- You can share content from your computer screen, such as a PowerPoint presentation or a website, for other participants to view.
- Open the content you want to share, such as a PowerPoint presentation or a webpage, on your computer.
- Click the Share, choose your desired content. If you want to share content with sound, select Share sound from the bottom left-hand corner. Finally, click Share.
- The shared content will be visible to all meeting participants.
- It is more secure to share only a specific application rather than the entire screen. Sharing the entire screen means that everything happening on your screen, such as pop-ups, will be visible to meeting participants.
- By default, all meeting participants can share their computer screens.
6. Annotate.
- Annotation tools are available when sharing the screen.
- With annotation tools, you can write, draw, and add stamps to the shared screen.
- The meeting participant sharing the screen can save the annotations made on the screen.
- If you are using Zoom in a browser, annotation is not possible.
- When sharing your screen, you can find the Annotate tool in the Zoom toolbar. Click Annotate to display the toolbar.
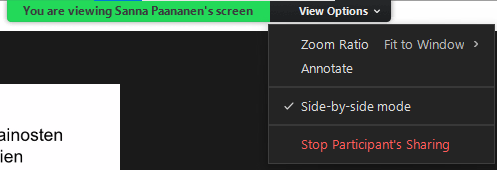
- When someone else shares their screen, you will find the Annotate tool at the top of the screen under View Options.

7. Participants.
You can view the list of meeting participants through the “Participants” button.
- Teachers may want to monitor the participant list as students join the Zoom meeting. You can see when a student connects their audio and if the student has a video camera.
- It’s easy to edit participant names through the participant list. By default, each meeting participant can click the Participants button, hover over their own name, click More, and select Rename. The Rename option is also available by clicking the three dots next to your video feed. The meeting organizer, with host privileges, can edit a participant’s name on their behalf if the participant cannot do it themselves.
- Sometimes, for organizational reasons, the teacher may ask participants to add, for example, their group number before their name to facilitate grouping for group work.
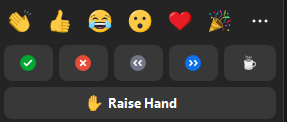
8. React.
Participate in polls, react to others’ speech, or raise your hand as a speaking request using the React button.
9. Breakout Rooms.
The teacher can use the Breakout Rooms option to divide students into small groups.
- When the teacher clicks Open All Rooms, students receive an invitation on their screen to join the breakout room.
- The teacher can also choose to automatically move students to breakout rooms or allow students to choose which room to join.
- Students can invite the teacher to a breakout room by clicking the Ask for help button.
- If needed, a student can return to the main room by clicking Return to main meeting.
- When the teacher closes the breakout rooms, students receive a notification that there is one minute left in the Breakout room. The student can continue working for that time or, if the group work is complete, return to the main room.
10. Teacher only: Record.
Only the teacher can automatically record the meeting.
11. Teacher only: Host tools.
The teacher can use the Host tools button to lock the meeting, enable or disable the waiting room, and determine whether meeting participants can share their screen, write in the chat, or turn on the microphone or camera.