Using student completion progress in Moodle
Completion Progress supports students’ time management, gives a visual view to proceeding on the course and helps to understand course workload. The teacher determines which activities and resources on the course are tracked. It is useful to view completion progress from the student point of view. Which activities are significant for student progress on the course.
What does completion progress look like?
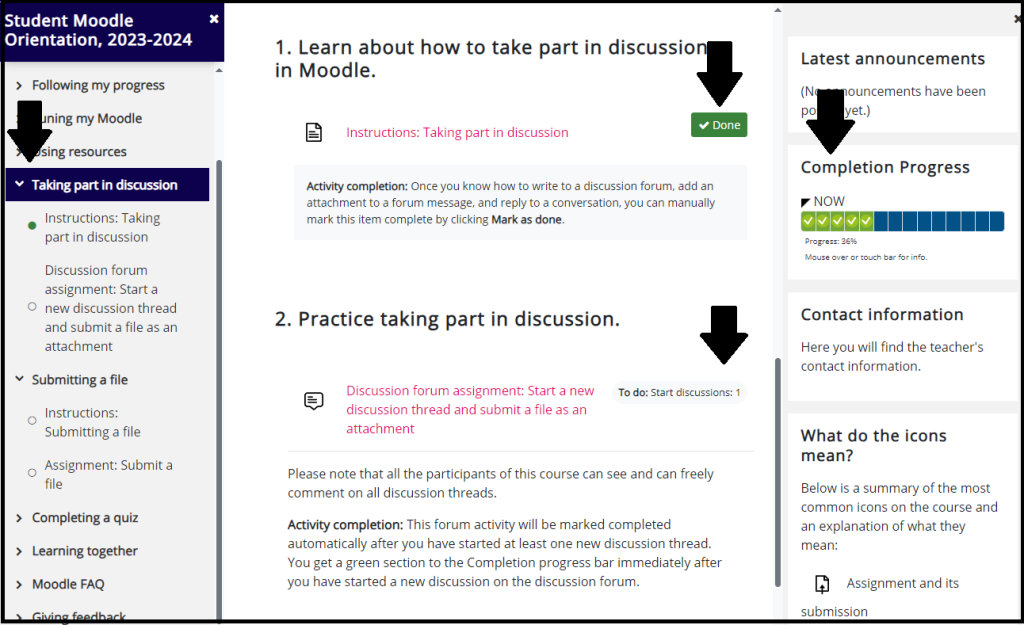
- In the left-hand side navigation, you can see a green dot in front of activities or resources when completion progress conditions related to this specific activity or resource have been met.
- In the middle section of the course, you can see the completion progress conditions next to the activities and resources. You can see the conditions also when you click the activity or resource name to open it.
- On the right-hand side, you can see the completion progress bar which combines all the activities and resources that have completion progress activated. In the teacher view, there is an Overview of students link.
The three options for completion progress.
1. Do not indicate activity completion
- Activity or resource does not appear in the Completion progress bar.
- This setting is suitable for activities and resources which are not compulsory. The course Q & A forum is a good example of an activity like this.
2. Students can manually mark the activity as completed
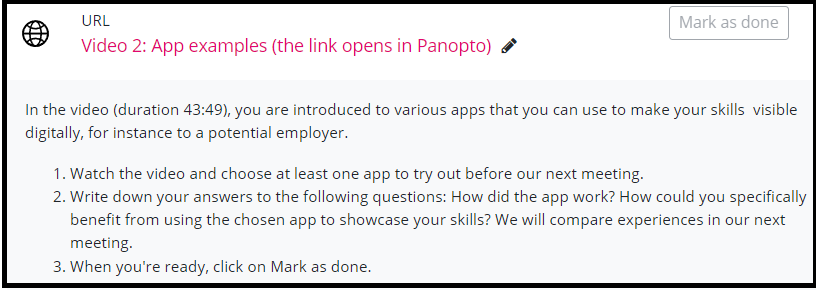
- This setting promotes student self-direction and is suitable especially if students work independently on the course.
- It may be that students mark resources completed without even opening them or they may forget to mark the resources completed. The teacher needs to instruct the students on why and how to mark their activity manually.
- In the example below, students are instructed to watch the video and mark it done themselves.
3. Show activity as complete when conditions are met
- Moodle can follow automatically, for example, how many messages have been posted to a forum, if an assignment has been submitted, or if an assignment has been graded.
- In an assignment activity, you can have, for example, three conditions that need to be completed before a completion progress section turns green.
- The student can see the conditions as concrete phases in the assignment activity.
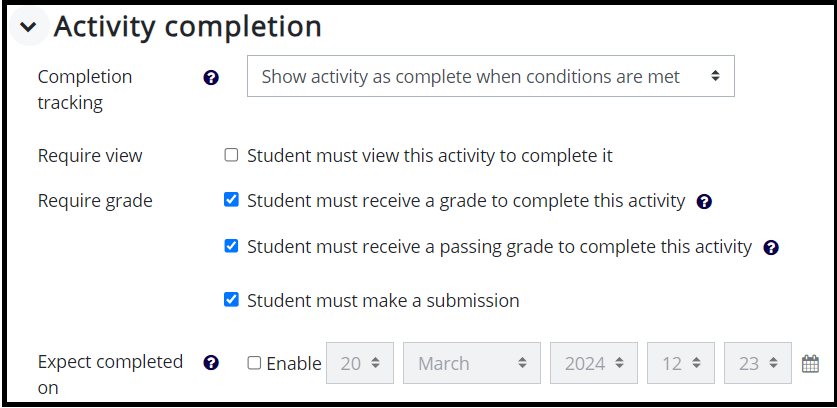

- A box with a dotted border means that a tick appears automatically when the student completes the activity according to the conditions set by the teacher.
Overview of students
The teacher can quickly see an overview of all students and their progress by clicking the Overview of students icon below the Completion progress bar.
- Through the overview, the teacher can see all students’ progress on the course both visually and in percentages.
- If groups are in use on the course, the teacher can view student groups’ or all course participants’ completion progress.
- If the teacher notices that some students are not progressing on the course as planned, the teacher can send a message to selected users from the bottom of the overview of students list.
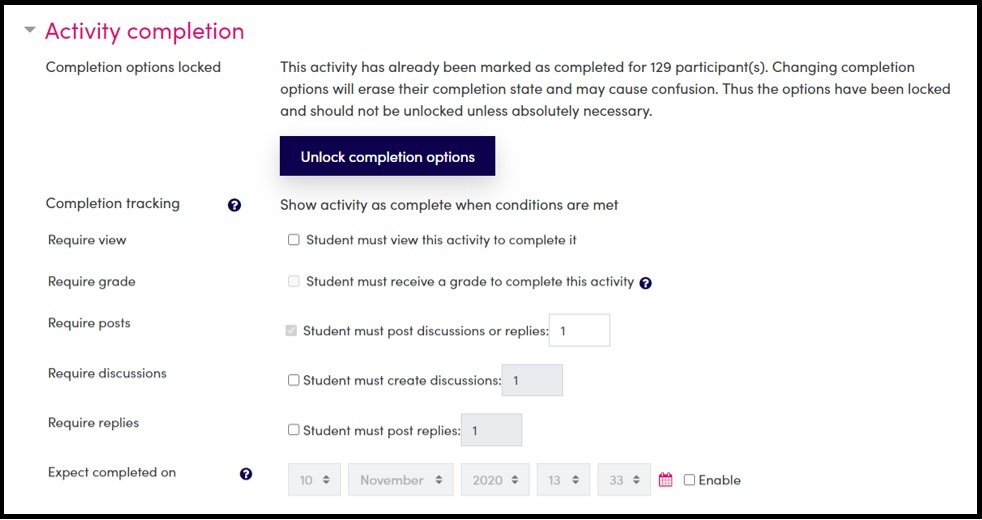
Activity completion settings are locked
Activity completion settings get locked when the activity is marked completed for at least one student in the Completion progress bar.
Locking protects student progress as it is not possible for the teacher to change the settings and erase student completion state accidentally.
- For example, in the image above the only completion requirement for the forum activity is one forum post or reply. If the teacher changed the settings and added requirements, all students’ Completion progress bars would reset.
- If you unlock the completion options and change the requirements, inform the students. Aim to determine the requirements before the students start working on the activity.
Configuring Completion progress bar settings.
You can change the outlook of your completion progress bar. To do this, click the gear icon next to the completion progress bar and choose Configure completion progress block.
In the settings you can determine,
- In which order activities and resources appear in the bar.
- How long bars are presented (squeeze: squeezed into one bar, scroll: a bar that can be scrolled, wrap: a bar with multiple lines)
- If also progress percentage is shown to students.
Below, you can see an example, where the course has two completion progress bars and the other bar has the wrap setting activated to show the long bar in multiple lines.
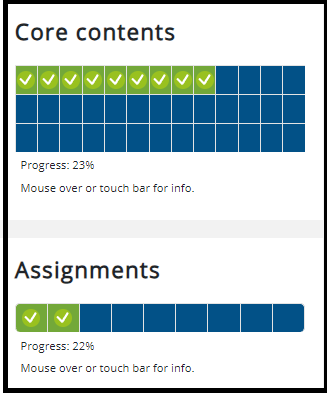
More than one completion progress bar on a course.
If your course consists of several large entities or has several groups which complete different activities, you can add, in addition to the one default bar, other completion progress bars.
- Click the Edit mode on.
- Click Add a block in top right-hand corner and choose Completion progress.
A new completion progress bar appears at the bottom of the right hand side block of the course.
You can edit the settings by clicking the gear icon on the top right-hand corner of the Completion progress bar.
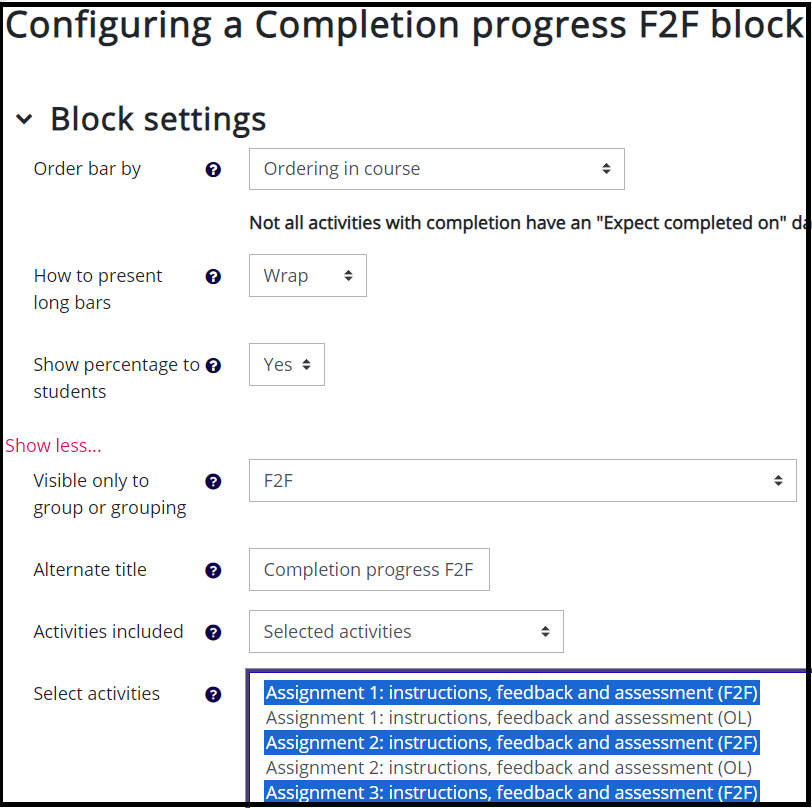
- Visible only to group or grouping: You can determine that the bar is visible to only a particular group or grouping on the course.
- Alternate title: You can name the Completion progress bar so that you as the teacher can distinguish between the Completion progress bars for different groups or that your students know which completion progress bar refers to which part/content of the course.
- By default, all activities or resources which have activity completion activated appear on the bar.
- Activities included: Selected activities: If you add several Completion progress bars on the course, you can choose which activities appear in which Completion progress bar. Select the activities to the bar in Select activities.
- If you use the Selected activities option, you need to add new activities or resources manually to the completion progress block you want them to appear in.
