Making a reservation
Students of certain degree programmes are entitled to reserve certain rooms. The rooms that can be reserved are indicated by an open lock icon. You can also make reservations via Tuudo app.
- In the Room field, select the desired room. To select the room, start typing the first characters of the room name or code OR click the Search rooms button to open a search window where you can search for a room with specific criteria or browse the rooms by office.
- If you usually book rooms from certain campus you can choose as a default campus. Write campus you want to Office box and tick “Save offices as default”, then click “Search”. After this every time you open Search room office field is filled.
- You can change the campus if you need to. If you don’t want to change the default settings don’t tick “Save offices as default” when you search different campus. Just add information you need and click “Search”.
If you don’t want any campus to be as a default and you want every time choose the campus by yourself leave Office box empty and tick “Save offices as default” and click “Search”.
- On ”Room type” section you can add for example auditoriums or if you don’t add any room type system finds all the rooms.
- Leave the “Room is available on selected time” option selected and click the ‘Search’ button to run the search. Then you see only those rooms that are available on that time.
- Click on a suitable date and time in the calendar at which the newly selected resources (room + person) have non-booked time available in their calendar. A reservation cannot be made in the past.
- A reservation form is displayed where you can check the details of the reservation.
- When you are done, click Save.
Reservation form
If you are unauthorised to reserve the room concerned, you will be able to enter a reservation on the reservation form, but you will not be able to save it. When you try to save the form, the system will notify you that you do not have the right to make the reservation and no reservation will be made. If you are not authorised to make a reservation, this is indicated by a closed lock icon next to the room name.
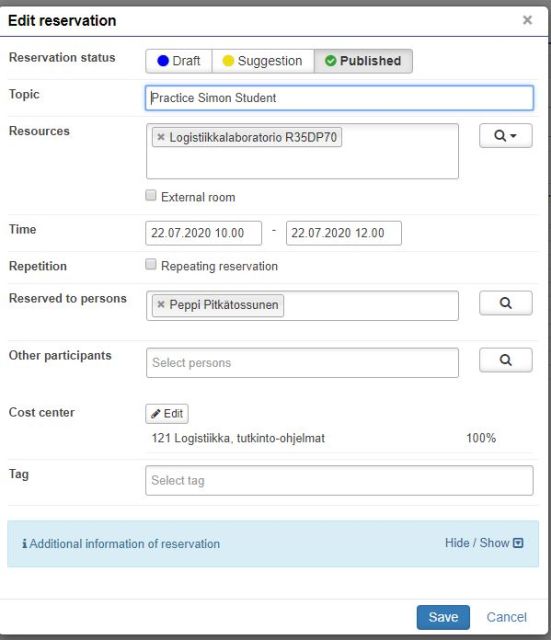
- Topic – name of the reservation, e.g. Practice time, Sam Student
- Time (begins–ends) – the start and end time of an individual reservation. If you see only date just click it so you can edit beginning and ending time.
- Repetition – you can set the reservation as recurring e.g. for several weeks or successive days. You can select whether the reservation is to be repeated daily or weekly, how many times, on which weekdays, and since when. You can also preview the reservation before saving it.
- Resources – classroom, select the room name/code or use the ‘Search rooms’ feature if applicable by clicking on the magnifying glass icon.
- Cost center – populated automatically, but can also be corrected manually if the suggested cost centre is incorrect.
- Additional information of the reservation
Deleting and editing a reservation
To delete or edit your reservation afterwards, click the desired reservation. The reservation will show a gear icon in the top-right corner. In the new window that opens, click the Edit button. The reservation form is then displayed where you can edit the fields you want. When you are done, save the reservation.
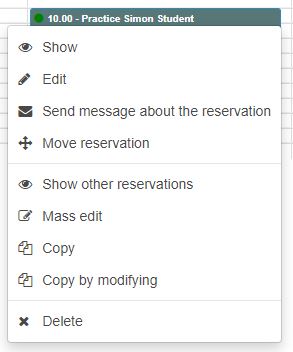
To delete a reservation, click the desired reservation and select Delete. If you have made a recurring reservation, the day you selected will be deleted by default.
You cannot edit or delete any reservations made by other users.