Editing and viewing study right information
To view and edit study right information, first retrieve the student or their study right. You can edit the study information, attendance information, additional study right information, PLP information, the student’s study attainments and information related to international mobility associated with the study right.
Viewing and editing the information of an individual study right
First, retrieve the student or study right using the search feature:
- Run a student search in the preferred manner (see Study right search)
- From the search results, select the desired student.
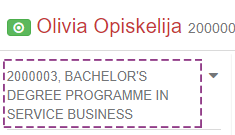
- Click on the student’s name to proceed to the personal information view
- Click on the student number to proceed to the study right view
When you have retrieved the desired student and switched to the student’s data, use the left-hand side navigation to edit the study right information.
Selecting the study right in the view of an individual student
If the student has more than one study right, click the arrow symbol below the student’s name to display the other study rights.
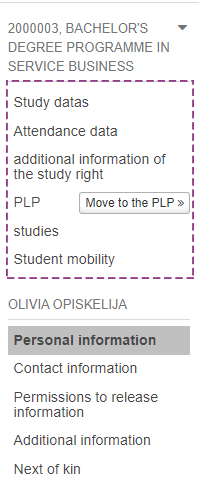
Study data
From the left-hand side navigation, select Study datas
The study data allows you to view and edit the data saved under the study right.

‘Edit’ button
- Select Edit
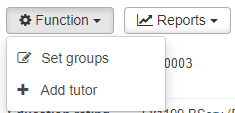
- Change the data in the desired fields (Note! To edit groups, click Function -> Set groups)
- Save
‘Function’ button
Show original information
The system shows the information based on which the study right was created in the system. If you cannot see or edit a certain piece of information, your user profile does not allow editing that information.
Set groups
- Select Set groups
- Search for group(s) using the search field.
- Save
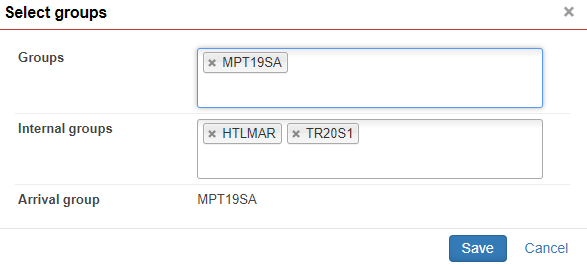
To delete a group, click the x icon before the name of the group you want to delete. A study right may have several groups associated with it.
Add specialisation
Jamk does not have specialisations enabled in the system so this feature cannot be used.
- Select Add specialisation
- Select a specialisation from the drop-down menu.
- Save
Add tutor
- Select Add tutor
- Select a tutor from the drop-down menu, for example:
- Opettajatutor (career tutor)
- Opinto-ohjaaja (study counsellor)
- Opintoasiainkoordinaattori (study affairs coordinator)
- Select the person using the search field
- Save
You can also add a tutor under ‘Tutors’. To delete a tutor, use the menu on the right-hand side of the row.
Mass editing of study rights allows you to make changes to the tutors for several students at the same time.
Add specifier
- Select Add specifier
- Select the specifier code (study right specifier codes are maintained by the administrators)
- Save
You can also add a specifier under ‘Specifiers’. To edit or delete specifier, use the menu on the right-hand side of the row.
Add qualification
- Select Add qualification
- Select ‘Qualification code’
- Select ‘Date’
- Enter the necessary notes
- Save
You can also add a qualification under ‘Qualifications’. To edit or delete qualifications, use the menu on the right-hand side of the row.
Add certificate marking (in practice a language phrase)
Certificate markings are usually language phrases.
- Select Add certificate marking
- Select the language phrase code.
- Save
You can also add a certificate marking under ‘Certificate markings’. To edit or delete certificate markings, use the menu on the right-hand side of the row. If there are several certificate markings, you can change the order they appear using the arrow button on the left-hand side. The order of the certificate markings will determine the order in which they will appear in the final certificate.
The language phrase certificate marking is displayed in red until it has been evaluated. To evaluate the language phrase in this view, edit the marking. If you cannot see or edit a certain piece of information, your user profile does not allow editing that information.
Add personal certificate marking (free-text field)
- Select Add personal certificate marking
- Enter the personal certificate marking in Finnish and English.
- Save
You can also add a personal certificate marking under ‘Personal certificate markings’. To edit or delete personal certificate markings, use the menu on the right-hand side of the row.
‘Reports’ button
- Select the Reports button.
- Select the desired report file format (e.g. pdf, rtf).
- Fill out the fields needed for generating the report (depending on the reports, e.g. signatory, visibility of the personal identity code, additional information)
- Run the report.
Attendance data
From the left-hand side navigation, select Attendance data
In this view, you can view the student’s attendance history as well as a summary of the attendances in the ‘Summary’ box.
‘Add attendance’ button
- Select Add attendance.
- Enter the requested information: semester, present or not, date and additional information, if any.
- Save
To edit or delete attendance or absence details, use the menu on the right-hand side of the row.
- At the end of the attendance row, select Functions
- Edit or delete semester attendance data
‘Studies ended’ button
The ‘Studies ended’ functionality is mainly used for terminating the studies of exchange students and open UAS students.
- Select Studies ended
- Enter the requested information:
- From the ‘Semester’ field, select the semester for which the termination of studies is to be recorded. If the student has enrolled as attending or absent for the upcoming semesters, the periods following the termination of studies are deleted. The student’s study attainments are locked. Set the date entered in the first date field as the study right end date.
- Select the code that corresponds to the reason of the termination of studies as the termination code.
- Date fields
- Recommendation: In the first date field, enter the date for which the termination of studies is to be registered. Set this date as the study right end date.
- This feature is not recommended to be used! If you enter a date in the second field, set the last day of the study right, i.e. 31 July or 31 December, as the study right end date.
- In the ‘Additional information’ field, you can enter additional information concerning the end of studies as applicable.
- Save
To edit or delete the entries made, use the menu on the right-hand side of the row.
- At the end of the row, select Functions
- Edit or delete data as applicable
- Deleting an entry releases the locking of study attainments, but any previously deleted enrolment data, for example, will not be automatically restored. These will need to be entered again as applicable.
‘Add resignation’ button
The ‘Resignation’ functionality is used for registering the resignations of degree students and Teacher Education College students.
- Select Add resignation
- Enter the requested information:
- From the ‘Semester’ field, select the semester for which the resignation is to be registered. If the student has enrolled as attending or absent for the upcoming semesters, the periods following the resignation are deleted. The student’s study attainments are locked. Set the date entered in the first date field as the study right end date.
- From the drop-down menu, select the code that corresponds to the reason of the resignation as the resignation code
- Date fields
- Recommendation: In the first date field, enter the date for which the resignation is to be registered. Set this date as the study right end date.
- The use of this feature is not recommended! If you enter a date in the second field, set the last day of the study right, i.e. 31 July or 31 December, as the study right end date.
- In the ‘Additional information’ field, you can enter additional information concerning the resignation as applicable.
- Save
To edit or delete the entries made, use the menu on the right-hand side of the row.
- At the end of the row, select Functions
- Edit or delete data as applicable
- Deleting an entry releases the locking of study attainments, but any previously deleted enrolment data, for example, will not be automatically restored. These will need to be entered again as applicable.
Add graduation
When the student is registered as graduated, any enrolments as attending or absent are deleted and the student’s study attainments are locked. The study right ends on the graduation day you choose.
- Select Add graduation
- Enter the requested information.
- Approve
To edit or delete the entries made, use the menu on the right-hand side of the row.
- At the end of the row, select Functions
- Edit the data or Cancel graduation.
- Deleting an entry releases the locking of study attainments, but any previously deleted enrolment data, for example, will not be automatically restored. These will need to be entered again as applicable. The original study right end date is set as the study right expiry date.
Additional information of the study right
From the left-hand side navigation, select additional information of the study right
Under ‘Additional information of the study right’, you can add or edit notes concerning the study right, background communities, notes on daily educational allowance and transfer student.
Notes
- Select Add note.
- Select a code from the drop-down menu.
- Enter the additional notes in text format.
- Save
To edit or delete the entries made, use the menu on the right-hand side of the row.
- At the end of the row, select Functions
- Edit or Delete data as applicable
- Deleting an entry releases the locking of study attainments, but any previously deleted enrolment data, for example, will not be automatically restored. These will need to be entered again as applicable. The original study right end date is set as the study right expiry date.
Background society
A study right may only have one background society.
- Select Edit background society
- Enter the data in the fields.
- Save
Notes on daily educational allowance
A number of different notes on daily educational allowance can be entered for a study right.
- Select Add marking of the educational daily allowance
- Enter the start and end dates.
- Save
To edit or delete the entries made, use the icons on the right-hand side of the row.
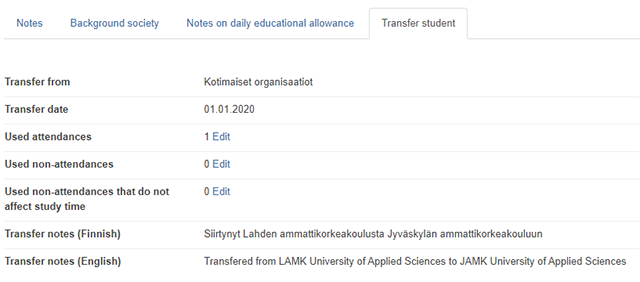
Transfer student
The start date of a transfer student’s study right must be first updated to the study right basic information. This date is the date when the student started their studies at their home higher education institute. You can then add the information about the transfer to the study right additional information.
- Select Edit
- Enter the data in the fields
- In the ‘Transfer from’ field, select the higher education institute the student is transferred from.
- Enter the date of the semester when the transfer entered into force as the transfer date, i.e. 1 August or 1 January.
- In the ‘Transfer notes (Finnish)’ field, enter the notes related to the transfer.
- In the ‘Transfer notes (English)’ field, enter the same information in English.
- Save
The semesters during which the student was in attendance and absent in their previous education must be updated to the study right. This information is obtained from the certificate provided by the student.
Add entries on the previous semesters in the study right attendance data. For more detailed instructions on how to add attendance data, see section Attendance data on this page.
The ‘Add attendance’ field now displays Rivi koskee toista organisaatiota. If the attendance or absence pertains to enrolment in another higher education institute, tick this box.
PLP
From the left-hand side navigation, select PLP
Use the PLP menu under the study right to set an entry concerning the student’s graduation willingness, confirm the graduation data, and set up an PLP for the student based on the curriculum.
Setting graduation willingness
This feature in not necessarily in use at Jamk! A certificate application is submitted via e-services, so setting graduation willingness is not by itself sufficient for applying for a certificate. This means that the student must also fill out the electronic application.
- Select Set graduation willingness
- Enter the target graduation date and additional information, if any.
- Approve
Graduation data confirmation
- Tick the I have checked the study right data for graduation box.
- In the window that appears, click Data checked.
- The data is now checked and a marking to this effect will appear on the page.
To remove the ‘Graduation data confirmation’ marking, click remove marking on the right-hand side of the row. The marking will prevent editing the PLP.

Setting up the PLP
- Select the Study plan identifier which will be used in based of the PLP.
- Save
- Reset study plan (this selection appears if no curriculum has been set for the study right previously)
- If applicable, you can also select a study path (optional)
- Select Default accomplishment plan
- Click the Move to the PLP button to proceed to the student’s PLP.
You can see more detailed instructions on how to set up an PLP under Setting up an PLP -page.
The student’s PLP
Click the Move to the PLP button to proceed to the student’s PLP.
The Move to the PLP button is not available if the student does not have a curriculum assigned to their study right and an PLP set up based on it. If the student has no PLP, they will not be able to enrol for courses.
Studies
From the left-hand side navigation, select Studies.
This will display the studies completed by the student, the extent of the completed studies in credits and the average of the credits awarded. To show failed and incomplete studies, tick the Show failed and incomplete box. Click the ‘Columns’ button to add or delete the columns displayed on the page.
If you cannot see or edit any of the following information, your user profile does not allow editing that information.
To remove a study attainment from reporting, tick the checkbox on the left-hand side of the study attainment. This means that the study attainment concerned will not be included in the reports, such as the transcript of records. The use of this feature is not recommended.
The lock icon on the right-hand side of the box indicates whether the study attainments are locked (=cannot be edited) or unlocked (=can be edited). Study attainments are locked upon graduation, for example.

Edit a study attainment
- At the end of the study attainment row, select Actions.
- Select the desired action, i.e. Edit, Lock or Delete
- The ‘Lock’ action is used for locking the study attainment, in which case it cannot be edited.
- Edit the data as applicable, or lock or delete the study attainment.
- Select Save NOTE! The right to use this functionality is restricted.
The ‘Studies’ page shows the theses related to the study right, certificate markings and personal certificate markings. Certificate markings and personal certificate markings are discussed in more detail in the section entitled ‘Study data’.
Thesis registration and evaluation
The thesis registration and evaluation will change following the deployment of the Wihi system. Prior to the deployment of the Wihi system, theses are recorded either via the study right study attainments or the student’s PLP. You can register the other information related to the thesis except the grade beforehand. When a grade is registered for the thesis, the following fields are mandatory: name of the thesis in Finnish and English, grade, language of the thesis, language of the maturity test, municipality, and assessor.
- Select Assess thesis.
- Enter the name of the thesis in Finnish and English.
- Select the Grade from the drop-down menu.
- Select the Language of the thesis from the drop-down menu.
- Select the Language of the maturity test from the drop-down menu.
- Click the radio button to mark the thesis as commissioned if applicable.
- Select the Municipality where the thesis was completed from the drop-down menu.
- Select the Evaluation date.
- Search for the name of the Assessor from the search field.
- Notes for students – This field is not in use!
- Internal notes
- The External note for Transcript of Records will be displayed in the personal learning plan and in the transcript of records printed out by the student under the study unit name.
- The study units related to the thesis and the grades recorded for them are shown at the bottom of the box.
- Select Save.
Study entitlement period
Information related to a degree student’s study right in a certain period is called study entitlement period. A new study entitlement period is created for example when the student is changing his/her degree program. New Study entitlement periods tab appear in the study right information. The tab is only visible to users who have the Read right for Study entitlement period.
The Study entitlement period tab contains a list of study entitlement period from the newest to the oldest. The view shows the time period when it has been valid for each study entitlement period. You can view the study entitlement period information that was valid in that time period.