Implementation assessment
The teacher assess the study attainments for the course implementation. The assessment can be edited separately for each student, e.g. name, scope in credits, implementation parts. The number of credits may not be changed after the assessment. If the student earns additional credits on the same subject after the assessment, they must be re-assessed under a separate study unit. They may not be added/edited under a completed study unit that has already been assessed. Please note that the implementation grade should be registered for the same month as the end of the implementation.
You can assess study attainment for student who’s study right has ended. Assessment dates must be inside study right date.
Principles for creating implementation parts in Peppi
The minimum scope of the implementation part is 1 ECTS credit. Decimals are not used unless there is a valid reason to use them. The reason should be related to the requirements of working life, e.g. medical bill, hot work card or hygiene passport.
The name of the implementation part must be informative in order to understand what competences are included in the implementation part. The name must be in Finnish and English.
If the implementation parts are used, the name should describe what competence the student masters for the implementation part and with what grade. The implementation part should preferably describe the competence in one word. The implementation parts go e.g. to Virta service, so they should be informative, thus not referring to learning tasks or other methods.
For implementations that take place over several semesters or academic years, it is recommended to do implementation parts. In this way, students’ study attainments can be recorded for the initial implementation during several semesters or academic years. If the student already has implementation parts with another implementation, these must be combined by the teacher. It is important that students’ study attainments in Peppi is up to date, as they are transferred to the authorities (e.g. KELA, the Ministry of Education and Culture) and statistics according to the time of study attainment.
All implementation parts must be assessed in Peppi in order for the final grade to be recorded.
Searching for implementations
- From the top navigation on the Teacher’s Desktop, select Assessments -> Implementation assessment.
- Enter the desired search criterion or criteria.
- Select Search.
You can open the search results in Excel by clicking the Search results XLS -icon.
For further instructions on how to search for implementations.
Saving a search
- Search for the desired implementations using your selected search criteria.
- Click Save search to save the search you made.
- Enter a name for the search.
- Click Save.
For further instructions on how to save implementation searches.
Own implementations
Under Own implementations, you can search for implementations to which you have been assigned as the teacher.
- Select My ongoing implementations, My future implementations or My old implementations.
- The search results are listed on the page.
For further instructions on how to search for implementations.
Common functionalities on the Evaluation page
- Search for the implementation whose enrolments you want to process.
- From the right-hand side of the implementation row concerned, select Actions -> Assessments
OR
From the right-hand side of the implementation row concerned, select Actions -> Show implementations -> Assessments - The Implementation assessment page opens.
On the Implementation assessment page, you can view the students who have enrolled to the implementation. The students who were rejected in the Enrolments view will not be shown in the Implementation assessment view.
![]()
Reports
Use the Reports button to print out reports related to the students.
- Select Reports.
- Select a report form the drop-down menu.
- Enter the necessary information.
- Select Run report.
Implementation assessment, hide or show parts
You can choose whether to show implementation parts or only the implementation on the assessment page.
- To show the implementation parts, click Show parts.
- To hide the implementation parts, click Hide the parts.
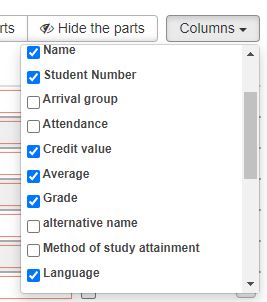
Showing/hiding columns in the Implementation assessment view
You can add (or remove) columns in the Implementation assessment view.
- Open the Columns menu.
- Tick the checkbox next to the column that is to be displayed. Click on the view to close the menu.
- Uncheck the checkbox next to the column that is to be hidden.
- Click on the Implementation assessment view or the Columns button to close the view.
If you can´t save students implementation assessments and get and error message choose from Columns menu Language to be seen
Processing students in the Assessment view
In the Assessment view, you can add and delete students, set default date of study attainment and change the assessor as applicable.

Set default date of study attainment
You can set a default date by pressing the Set default date of study attainment button and selecting the date from the window. The date cannot be set in the future. The set default date of study attainment appears on the right side of the button row. The selected date will automatically be used as an assessment date. The date is user-specific, which means that each teacher in the implementation can set his/her own default date.
Adding a non-enrolled student
If a student has not enrolled to the implementation, you can add them as follows:
- Select Add student.
- In the Add students modal window that appears, search for the student by name or study entitlement number.
- Select the desired student(s) from the list.
- Select Save.
Removing a student from an implementation
- Open the menu at the end of the student’s row.
- Click Remove student from the course.
- Acknowledge the confirmation window.
If the student has received an assessment for the implementation, the student cannot be directly removed. The assessment must be first deleted from the student, after which they can be removed from the implementation. Note that according to the degree regulations, the students’ approved study attainments may not be removed.
Setting a default assessor
By default, the Assessor column displays the teacher information obtained from the implementation details. If this information is incorrect or for some other reason the assessor is a person other than the teacher, you can change the assessor’s name. Teachers may change the assessor’s name separately for each student. Changing the assessor’s name separately for all students at the same time requires more extensive user rights.
Separately for an individual student:
- Select the grey pen symbol in the column.
- Search for the assessor in the Edit value modal window.
- Select Save.
For all students (requires sufficient user rights):
- Click the Set default assessor button.
- In the Set default assessor modal window that appears, search for the assessor.
- Select Save.
Changing the scope of the implementation separately for an individual student
This feature requires sufficient user rights.
- In the Cr column, enter the new scope in credits.
- Enter the assessment at the same time.
- To view the changed scope, hover the mouse over the Original scope icon in the student’s row.
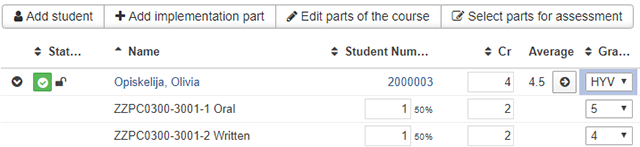
Assessment
The implementation assessment process varies slightly depending on whether or not implementation parts are used for the implementation. The assessment process is slightly different for thesis-related implementations, such as the thesis part 1 and maturity test.
Implementation assessment when the implementation has no implementation parts
By default, the view displays the information obtained from the implementation, so the assessor is only required to add the grade separately for each student.

- In the Grade column, add the grade to be awarded to the student by selecting it from the menu (grading scale).
- The data will be saved automatically for the student (no separate Save button).
- When the grade has been successfully assigned, the Status icon in front of the student’s name changes to green.
Assessment of implementation and it’s parts
Implementation parts can be added to the implementation before the final assessment either for all students at the same time or separately for each individual student. If the student’s enrolment to the course has not been approved in the Enrolments section, no implementation parts will be displayed for the student in the implementation assessment.
Adding an implementation part for all students
Use this feature to add implementation parts to all students who do not yet have a final assessment. If you want to assign a grade for different parts of the implementation, ensure before adding the implementation parts that the Weight of the grade option has been selected to be displayed from the Columns drop-down menu. When the Weight of the grade option has been selected, the option for changing the weight of the grade will be displayed when implementation parts are added. The weight of the grade must be at least one (1).
- Select Add implementation part
- In the Add implementation part to all modal window, select the desired number of implementation parts (the number of parts will increase automatically when you enter a name for the first part)
- NOTE! Pay attention to the naming of the implementation parts. The implementation parts will be displayed to the student and will appear in certain printouts as well.
- Enter names for the implementation parts in Finnish and English.
- Enter a scope in credits for the implementation parts.
- NOTE! The sum of the scopes must equal the scope of the implementation.
- If you selected the Weight of the grade column for the Implementation assessment window, it will also be shown in the Add implementation part to all modal window.
- Also define the weight of the grade by entering a value in the field (NOTE: must be at least one (1)).
- When you have added the desired number of implementation parts, select Add.
Adding an implementation part for an individual student
- Click the down arrow icon at the end of the student’s row.
- Select Add implementation part
- In the Add implementation part to all -window, select the desired number of implementation parts (the number of parts will increase automatically when you enter a name for the first part)
- NOTE! Pay attention to the naming of the implementation parts. The implementation parts will be displayed to the student and will appear in certain printouts as well.
- Enter names for the implementation parts in Finnish and English.
- Enter a scope in credits for the implementation parts.
- NOTE! The sum of the scopes must equal the scope of the implementation.
- If you selected the Weight of the grade column for the Implementation assessment -window, it will also be shown in the Add implementation part to all -window.
- Also define the weight of the grade by entering a value in the field (NOTE: must be at least one (1)).
- When you have added the desired number of implementation parts, select Add.
Editing implementation parts
- Select Edit implementation parts.
- In the window that appears, you can delete an implementation part and edit its name or scope.
- If you add the Weight of the grade column in the Implementation assessment window, it will also be shown in the Add implementation part to all modal window.
- Make the necessary changes.
- Select Save.
Entering a grade based on implementation parts
Irrespective of the scope of the implementation parts, a non-weighted average is calculated of the assessments of the parts. The average is displayed in the Average column.
In addition to scope, you can also add the weight of the grade factor to the assessment of the parts so that the overall grade will be weighted in the desired manner.
Assigning a grade using the average of the assessments of the parts
- To assign specific weights to the assessments of the parts, do the following:
- From the top-right corner, select Columns -> Weight of the grade
- The Weight of the grade fields are displayed beside the Cr -fields next to the assessments of the parts.
- Assign weights to the assessment of the parts as desired.
- When you are satisfied with your choices, the resulting average is shown in the Average column.
- Click the grey Set as grade symbol to set an overall grade for the course implementation determined by the average, taking into account the rounding rules.
Assigning a grade directly to an implementation
- You can also enter an overall grade for the implementation irrespective of computational factors by selecting a value in the Grade column.
- The data will be saved automatically for the student (no separate Save button).
- When the grade has been successfully assigned, the Status icon in front of the student’s name changes to green.
Changing or deleting an assigned assessment
The teacher can enter a retake for the student, correct a previous assessment or delete an erroneous study achievement.
Adding a retake or improved grade
The Add retake feature is used when e.g. a student has failed an implementation part or an implementation and has later acceptably completed the failed sub-areas or if the student has improved her/his passing grade. When this feature is used, a record of the retake will be shown in the study history. The retake is entered under the same implementation where the original grade is.
- Click the arrow button at the end of the student’s row.
- Select Add retake
- In the Add retake modal window that appears:
- Click the Assessment menu and select a grade.
- Click the Assessment date field and select a date.
- Click the Assessor field and enter the name you wish to search for. Select the correct name from the search results.
- When you are done, click the Add button.
Correcting a study attainment
The Correct the study attainment feature is used in a situation where the teacher has entered an incorrect grade for an implementation part or implementation. When this feature is used, a record of the correction will be shown in the study history.
- Click the arrow button at the end of the student’s row.
- Select Correct the study attainment.
- In the Correct the study attainment modal window that appears:
- Click the Assessment menu and select a grade.
- When you are done, click the Save button.
Deleting a study attainment
This feature deletes the entered assessment data. A record of this operation will remain in the study history.
- Click the arrow button at the end of the student’s row.
- Select Delete
- Acknowledge the confirmation window that appears.
- The colour of the student’s Status icon changes and the value updates to Assessment pending (tooltip).
- The assessment data is removed from the student’s row.
Study history
- Click the Show study attainment history button on the student’s row.
- The Study history modal window displays the student’s study history.
- Click Close to close the modal window.